- Windows编程革命简史 | 酷壳 - CoolShell.cn
- 忒给力了! 想起: 新同事 | zonble’s promptbook
- http://zonble.net/archives/2007_05/937.php
忍不住给个歌词吧,谁人有给力的曲,我们配首 微软革命之歌 :
M$ DLL Hell

起初,我说起初
那儿只有 Windows API 和 DLL Hell
为了消灭 DLL Hell
然后,DDE 出现了

但是,他们说DDE 有重大缺陷:
丫不是俺写的!
于是 OLE 出现了
除了名字和 DDE 不同
其它其实真的一样的哈!

后来,他们信了 C++
为嘛?!你懂的,你真得懂的!
于是 OLE 通过 MFC 进化成 COM
为嘛?!你懂的,你真得懂的!

但是,他们说 MFC 有重大缺陷:
丫不是俺写的!
于是 ATL 出现了
除了名字和 MFC 不同
其它其实真的一样的哈!

然后 COM 变身成 ActiveX
为嘛?!你懂的,你真得懂的!
于是 DLL Hell 再次被消灭鸟
为嘛?!你懂的,你真得懂的!

同时,他们说 JAVA 有重大缺陷:
丫不是俺写的!
于是 ActiveJ 出现了
除了名字和 JAVA 不同
其它其实真的一样的哈!

然后 COM 变身成 MTS
为嘛?!你懂的,你真得懂的!
于是 DLL Hell 再次被消灭鸟
为嘛?!你懂的,你真得懂的!

现在,他们说 Internet 有重大缺陷:
你懂的,你真得懂的!
于是 .NET 出现了
除了名字和 Internet 不同
其它其实真的一样的哈!

然后 C++ 变身成 C#
为嘛?!你懂的,你真得懂的!
于是 DLL Hell 再次被消灭鸟
为嘛?!你懂的,你真得懂的!

你懂的!
你真得要懂的!
为嘛?! DLL Hell 总在被消灭?!
为嘛?!
因为 M$ 在革命!
- t2t渲染:: 2010-10-09 02:21:39
- 动力源自::txt2tags
最近讲演频繁:
- 100820: IntroPy - Woodpecker Wiki for CPUG
- 100826: TDD4Py - Woodpecker Wiki for CPUG
- 100918: Software Freedom Day 2010 - SZLUG
- ...
俺在 S5: A Simple Standards-Based Slide Show System 中使用高桥流,幻灯页码轻易超过100! 即使有 Leo 帮助也感觉吃不住,
主要原因是直接写 HTML 太多标签干扰思維了...
其实早就知道有 rst->s5 的工具:
文档的确不多,中文的就找到上述 Inet6 兄的,但是和谐后,也无法方便的直接咨询
仔细看了哈文档,发现的确不复杂;
之于俺,只是要引用原先的样式,只要:
#   先随便生成个默认工程
rst2s5.py --theme <base-theme> <doc>.txt <doc>.html
#   再复制原先样式过来
ui/<base-theme> to ui/<new-theme>.
#   然后聲明使用新样式就好:
rst2s5.py --theme-url ui/<new-theme> <doc>.txt <doc>.html

#   俺在对应目录中的实际命令就是:
python rst2s5-Pygments.py  --current-slide --theme-url=ui/freedom index.rst index.html
最后发布时的 s5演示目录分布是:
http://zoomquiet.org/res/s5/100918-MyTools/rst2s5/
+-- i                   资源目录(图片什么的...)
|-- index.html          S5
|-- index.rst           rst撰写原文稿
|-- rst2s5-Pygments.py  定制支持 Pygments 语法颜色渲染的s5生成脚本
|-- s5defs.txt          rst2s5引用的 s5 配置文件
`-- ui                  样式入口
    +-- default         默认样式
    `-- freedom         定制样式
和S5 幻灯组织是完全对等的撰写:
- HTML 首页:
<div class="slide" id="slide0">
Blalala
</div>
- rST首页:
==================================================================
我的工具箱
==================================================================
- HTML幻灯页:
<div class="slide">
<h1>标题</h1>
内容
    <div class="handout">
    隐藏提示
    </div>
</div>
- rST幻灯页:
标题
=========

.. container:: handout

   隐藏提示

内容
- 唯一注意:
-
html->rst 的撰写只有更加 WYTIWYG 很容易习惯;
参考: http://docutils.sourceforge.net/docs/user/rst/quickref.html Quick
主要得习惯的只有:
- 标题和 MoinMoin 语法不同使用
==================独立的标题引用行来聲明第几层的标题
- 列表项更加简单可以使用
+ 以及 - 相比* 要少按个键 ;-)
- 链接更加灵活了:
- 就地链接:
是也乎,是也乎`显示文字 <http://foo.org>`__ 是也乎
- 匿名链接:
是也乎,是也乎`显示文字`__ 是也乎

__  http://foo.org
- 全局链接:
.. _Zoom.Quiet:
    http://code.google.com/p/openbookproject/wiki/ZoomQuiet

...
是也乎,是也乎`Zoom.Quiet`_ 是也乎
- 就地图片:
.. image:: pix/Takahashi-method.jpg
    :align: center
    :scale: 150 %
    :alt: 高橋流
    :target: http://blog.derjohng.com/2006/04/12/takahashi-method-%E7%B0%A1%E5%A0%B1/
- 这个 target 就是链接! 文档中没有例子,找了半天...
- 全局图片:
.. |Takahashi| image:: pix/Takahashi-method.jpg
    :align: top
    :scale: 150 %
    :alt: 高橋流
    :target: http://blog.derjohng.com/2006/04/12/takahashi-method-%E7%B0%A1%E5%A0%B1/

...

任意文字中 |Takahashi| 嵌入图片...
align 这时,就是图片和文字流的行内相对位置,而不是图片在整个页面的排版,所以,只能有"top", "middle", "bottom"
- 其实不用专门记忆,每次渲染时, rst2s5 会进行检查,比如说:
$ python rst2s5-Pygments.py  --current-slide --theme-url=ui/freedom index.rst index.html
index.rst:34: (ERROR/3) Error in "image" directive:
"center" is not a valid value for the "align" option within a substitution definition.
Valid values for "align" are: "top", "middle", "bottom".
index.rst:34: (WARNING/2) Substitution definition "S5icon" empty or invalid.

.. |S5icon| image:: pix/S5icon.GIF
    :align: center
    :scale: 100 %
    :target: http://www.meyerweb.com/eric/tools/s5/
index.rst:1284: (ERROR/3) Undefined substitution referenced: "S5icon".
嗯嗯嗯, 使用 rst 进行 s5 撰写,完全是脚本组织的感觉了...连输出时的交互 error 通告都是 Python 味的..
比较囧是只有俺习惯并坚持的样式很搞:
- 默认的样式排版:
-
 -
- 定制的
Freedome样式: -
 -
主要的设计:
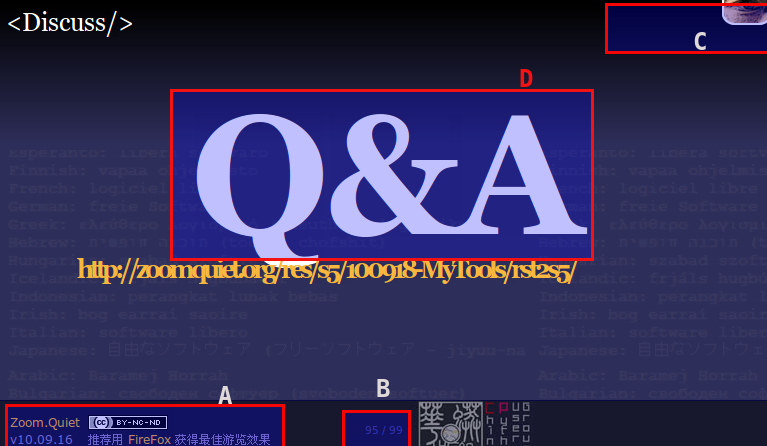
- A: 表格3栏格式的作者和版权聲明
<div id="footer">
<table><tr><td>
<a target="_blank"  href="http://code.google.com/p/openbookproject/wiki/ZoomQuiet">
Zoom.Quiet</a><br/>v10.8.17
</td>
<td rowspan="2">
<a  target="_blank" style="background-color:;" href="http://creativecommons.org/licenses/by-nc-nd/3.0/deed.zh">
<img src="icon/cc-byncnd-88x31.png"/>
</a>Recommend <a  target="_blank"
href="http://www.mozilla.org.cn">FireFox</a> for the best experience!
</td></tr>
</table>
    <div id="controls"></div>
</div>
- B: 页码/页数 提示
- C: 当页内容提示
<div class="slide">
<h1>
标题
<div id="sup">
    mov->时间->效能工具
</div>
</h1>
...
- 对应的rst2s5 效果:
-
 -
对应的设计:
- A: 表格的作者和版权聲明
.. footer::
   .. class:: borderless

   =============  ====================================
   `Zoom.Quiet`_  |cc-byncsa15|
   -------------  ------------------------------------
   v10.09.16      推荐用 `FireFox`_ 获得最佳游览效果
   =============  ====================================
- B: 页码/页数 提示
- C: 当页内容提示
标题
=========

.. container:: handout

   俺->工具->持续完善 |zqeye|

...
- 嗯嗯嗯,当然的得配合CSS:
- 注释掉默认样式
ui/<theme>/s5-core.css 中的
.handout {display: none;}
- 在专用CSS
ui/<theme>/takahashi.css中定制
div.handout{
    float: right;
    top:0;
    margin-top: -85px;
    margin-right: -30px;
    font-size: 16px; font-style : italic ;
    color: #385775;
}
div.handout a{
    color: #385775;
}

div.handout a:hover{
    color: orange;
    font-style : bold ;
}
- 还得在默认的样式调配文件
ui/<theme>/slides.css中引入自个儿定制的:
@import url(s5-core.css); /* required to make the slide show run at all */
@import url(framing.css); /* sets basic placement and size of slide components */
@import url(pretty.css);  /* stuff that makes the slides look better than blah */
@import url(takahashi.css);  /* stuff that makes the takahashi style slides */
@import url(rst2s5.css);  /* stuff that support slides gen. by rst2s5 */
- D: 专用高桥流样式, 在s5专用子聲明文件:s5defs.txt 中追加俺习惯的CSS类名:
.. Text Sizes
   ==========

.. role:: huge
.. role:: big
.. role:: small
.. role:: tiny
.. role:: takahashi0
.. role:: takahashi1
.. role:: takahashi2
...
- 成果对比:
-
小结这次迁移的时间消耗
- 0.5h 试用 rst2s5
- 0.5h 接入样式
- 0.5h 重构Leo 模式
- 2h 定制基于 rst2s5 的样式
- 3h 逐一页面重写
- 1h 修订发布
共计 7.5h
- 嗯嗯嗯,主要是在重过过程中,反复调整了对应的 CSS 样式...
- 好在一切可以快速复用到其它幻灯中了...
- t2t渲染:: 2010-10-09 02:21:37
- 动力源自::txt2tags
- 发觉近来自个儿买的书被读的越来越少
- 好容易得空也是积极看网络中可以免费获得的
何也?
- 买了就是自个儿的了,什么时候读就不重要了
- 网络中免费得的也都是有网络费用的,但是相对低很多,很占便宜的!在没有和谐前,多看哪...
然也?
时间的投入产出,是自个儿的控制和选择...
- 但是,读书的体验和氛围是有技巧营造的,就看自个儿是否愿意了...
- t2t渲染:: 2010-10-09 02:21:39
- 动力源自::txt2tags
GraphVizForMoin 插件部署到MoinMoin 中之后,很爽直!
参考: 在维基中使用 Graphviz~ 啄木鸟中的效果
可以说,解决了在维基中无法快速表达思维导图的问题:
- 思路:
-
- hacked MoinGraphViz 令其使用
-Tcmapx -o **.mp命令,输出热区定义
- hacked MoinMoin 相关脚本令输出到HTML 的图片认识可能的热区定义
- fxied:
-
path/2/moin运行实例/data/plugin/parser/MoinGraphViz/main.py 是插件的主体
- 很直白,快速就定位了具体代码进行了修订
- diff:
-
Index: tasks/wiki.KUP/MoinMoin/parser/MoinGraphViz/main.py
===================================================================
--- tasks/wiki.KUP/MoinMoin/parser/MoinGraphViz/main.py (revision 16946)
+++ tasks/wiki.KUP/MoinMoin/parser/MoinGraphViz/main.py (revision 16975)
@@ -56,4 +56,5 @@
         p = request.formatter.page
         self.renderer = Renderer(tool, targetdir=p.getPagePath('attachments'), encoding=config.charset)
+        self.attapath = p.getPagePath('attachments')

     def format(self, formatter):
@@ -61,5 +62,10 @@
         ##w('<div style="border:3px ridge gray; padding:5px; width:95%; overflow:auto">')
         s = self.renderer.render(self.raw)
+        imgname = os.path.basename(s)
+        #s = wiki2html(self.request, '{{attachment:%s}}' % os.path.basename(s))
         s = wiki2html(self.request, '{{attachment:%s}}' % os.path.basename(s))
+        #   100728 Zoom.Quiet fixed for include URL hotarea map define
+        pfImgMap = "%s/%s.map"%(self.attapath,imgname)
+        s += fread(pfImgMap)
         print '[TRACE] attachment URL:', s
         w(s)
@@ -182,5 +193,7 @@

 def renderGraphImage(tool, format, imagefilename, dotfilename):
-    cmd = '%(tool)s -T%(format)s -o"%(imagefilename)s" "%(dotfilename)s"' % locals()
+    #100728 Zoom.Quiet fixed for export URL hotarea map export
+    cmd = '%(tool)s -T%(format)s -o"%(imagefilename)s" -Tcmapx -o "%(imagefilename)s.map" "%(dotfilename)s"' % locals()
+    #cmd = '%(tool)s -T%(format)s -o"%(imagefilename)s" "%(dotfilename)s"' % locals()
     print '[TRACE] executing:', cmd
     os.system(cmd
- html 输出:
-
<img alt="graphviz-hostLegendG-a58ce04d28b92b59230a72964c27a9f8fc867de5.png"
class="attachment"
src="/moin/KupHostsMapping/MapLegend?action=AttachFile&do=get&target=graphviz-hostLegendG-a58ce04d28b92b59230a72964c27a9f8fc867de5.png"
title="graphviz-hostLegendG-a58ce04d28b92b59230a72964c27a9f8fc867de5.png" />
<map id="hostLegendG" name="hostLegendG">
<area shape="rect" href="http://wiki.s.kingsoft.net/moin/KupHosts" title="普配主机" alt="" coords="101,36,173,63"/>
<area shape="rect" href="http://wiki.s.kingsoft.net/moin/KupHosts" title="高配主机" alt="" coords="197,36,269,63"/>
</map>
注意: 发现,插件是直接使用{{attachment:导图图片名}} 标准的图片附件形式来发布的!
- 然而,HTML 中要想啓用热区图,至少要有专用属性的对应:
<img usemap="#俺的ImgMap" src="..."/>
<map id="俺的ImgMap" name="俺的ImgMap">
<area shape="rect" href="..." title="普配主机" alt="" coords="101,36,173,63"/>
...
</map>
- 在dot 输出的map 数据中,id/name 就是``digraph G { `` 第一行的那个G,可以任意命名,当然最好是E文
- 所以,就得找到方法来让 MoinMoin 对附件图片追加
usemap属性
找哈找,幸好有 ack-grep 快速从一堆脚本中定位到靠谱的代码段:
path/2/python2.5/site-packages/MoinMoin/formatter/text_html.py
...
    def attachment_image(self, url, **kw):
        ...
        if exists:
            ...
            if not 'alt' in kw:
                kw['alt'] = kw['title']
            #   100729 Zoom.Quiet fixed for support imagemap for Graphviz
            kw['usemap'] = "#%s"%kw['alt']
            return self.image(**kw)
        ...
追加一行就好...
虽然目标完成了,但是心里总感觉不好:
- MoinMoin 本身的脚本被hacking 了,就等于,以后升級,迁移时,都要维护这一hacking
- 很不 Pythonic 哪...
怎么样脱离 MoinMoin 系统本身来给附件图片追加
usemap 属性?
- 答案,自然是的 Ajax 哪
- jQuery 就是为这类快速夹塞儿式行为诞生的哪...
- 部署jQuery:
-
- 这是样式的事儿,所以:
path/2/moin实例/
+-- data
    +-- plugin
        +-- theme
            +-- 你的样式定义脚本
            +-- woodpecker.py ~ 俺用的
        def footer(self, d, **keywords):
            ... # 追加
            u'<!-- Finally, to loading jQuery Ajax Lib. -->',
            u'<script src="/wiki/common/js/jquery-1.4.2.min.js" type="text/javascript"></script>',
            u'<script src="/wiki/common/js/jquery-graphviz-map.js" type="text/javascript"></script>',

+-- htdoc
    +-- common
        +-- js
            +-- jquery-1.4.2.min.js ~ 官方运营用压缩版本
            +-- jquery-graphviz-map.js  ~ 动态行为定义用
- 使用jQuery:
-
- 看看文档,就两行搞定..
$(document).ready(function() {
	$("img[class='attachment']").each(function(){
	    $(this).attr("usemap","#"+$(this).attr("alt"));
    });
});
- 特别的:得考虑一页多个导图时的情况,所以是要进行
each() 循环处置
- 当然的,需要
MoinGraphViz/main.py插件的配合,以便从附图的 alt 中获得正确的图片热区ID
Index: tasks/wiki.KUP/MoinMoin/parser/MoinGraphViz/main.py
===================================================================
--- tasks/wiki.KUP/MoinMoin/parser/MoinGraphViz/main.py (revision 17010)
+++ tasks/wiki.KUP/MoinMoin/parser/MoinGraphViz/main.py (revision 17013)
@@ -65,5 +65,8 @@
         fImgName = os.path.basename(s)
         pfImgMap = "%s/%s.map"%(self.attapath,fImgName)
-        s = wiki2html(self.request, '{{attachment:%s}}' % os.path.basename(s))
+        #s = wiki2html(self.request, '{{attachment:%s}}' % os.path.basename(s))
+        s = wiki2html(self.request, '{{attachment:%s|%s}}' % (os.path.basename(s)
+                        ,fImgName.split("-")[1])
+                    )
         #   100728 Zoom.Quiet appended <map> data
         if os.path.exists(pfImgMap):
一切表现良好,无意间发现凡是有URL包含的 dot 图谱,被其它页面包含时就出错!
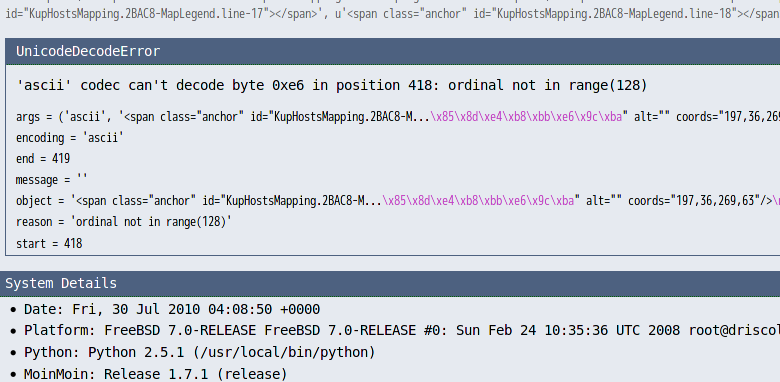
- 囧rz...:
-
- 尝试各种编码,未果
- 嘗試各种<map>的包装形式:
- 使用 <pre>
- 使用 <textarea>
- 都在 Include 时,可怜的出错了...
- 实在是因为 MoinMoin 不想处理正常的 HTML 标签属性的其它编码内容
- 好吧,俺就不给出无用的中文内容!
path/2/moin运行实例/data/plugin/parser/MoinGraphViz/main.py 追加一小段正则表达式替换
    def format(self, formatter):
        w = self.request.write
        #...
        #   100728 Zoom.Quiet appended <map> data
        if os.path.exists(pfImgMap):
            import re
            p=re.compile( 'title=\".+?\"')
            s += p.sub("title=\"\"",fread(pfImgMap))
            #s += fread(pfImgMap)
- HTML 输出:
-
<img alt="graphviz-hostLegendG-a58ce04d28b92b59230a72964c27a9f8fc867de5.png"
class="attachment"
src="/moin/KupHostsMapping/MapLegend?action=AttachFile&do=get&target=graphviz-hostLegendG-a58ce04d28b92b59230a72964c27a9f8fc867de5.png"
title="graphviz-hostLegendG-a58ce04d28b92b59230a72964c27a9f8fc867de5.png" />
<map id="hostLegendG" name="hostLegendG">
<area shape="rect" href="http://wiki.s.kingsoft.net/moin/KupHosts" title="" alt="" coords="101,36,173,63"/>
<area shape="rect" href="http://wiki.s.kingsoft.net/moin/KupHosts" title="" alt="" coords="197,36,269,63"/>
</map>
一切安定了...
- 思路不乱的情况下,主要问题就是定位代码段!以及测试!
- 面对一运行中的MoinMoin 进行测试开发时
- 使用sshfs 可以快速挂接远程服务器的任意目录,非常方便!
- 使用沙箱页面进行修订插件的测试,可以避免正常文章页面的中间调试失常..
- 在调试中,直接输出预想数据到 HTML 里看,比看系统日志,使用print 要方便
- MoinMoin 有完备的缓冲机制,要及时看到修订效果,得重启HTTPD
- jQuery 真的很好用,也好学!
- 下载:
-
diff: MoinMoin_parser_MoinGraphViz_main.py-from-r16946-to-r17013.diff
- 00:05 定目标
- 00:15 准备环境
- 01:30 探查运行环境,明确修订目标脚本
- 01:45 插件修订完成
- 00:15 图片应用map jQuery 嘗試
- 00:35 图片插入系统修订完成
- 01:00 正则表达式+jQuery 解决 Incldue() 时的编码问题
- 00:45 整理代码,发布到Blog
- 00:35 整理代码,反馈到MoinMoin.in
- 00:40 8次中断,回到工作场景的心理浪费
总计: ~ 6小时
- t2t渲染:: 2010-10-09 02:21:37
- 动力源自::txt2tags
嗯嗯嗯,俺一直使用 WACOM 的数字绘图板替代鼠标的 ;-)
- 去年生日,老婆升级了俺的 FAVO CTE-430
到 BAMBOO CTH-461
- 随着 Ubuntu 10.04系统,一同升级了驱动,非常好用:
- 小横板 248.2 x 176.1,和屏幕 1:1 对应,不用拖动,有空间感觉了直接就可以移动到对应区域!
- 无线压感笔,直接点击就是左击鼠标
- 笔有侧键,配置默认就是原先最舒服的:
- 触摸板的手指点击就不必要了
- 如何在Shell 中获取另外系统命令的输出并截获对应数码组合成新的命令?:
-
嗯嗯嗯,,,
嗯嗯嗯,,,,直接囧掉!
俺没有这种功力!
- 直接使用模板记录要执行的命令,预留可能变动的设备号:
#!/bin/sh
### xinput4bamboo.tpl
sleep 3 && xsetwacom set %s Touch "off"
- 配合xinput4bamboo.py
import sys,os
if __name__ == '__main__':      # this way the module can be
    """usage:
    $ xinput --list | grep "Wacom Bamboo Craft Finger" | python ./xinput4bamboo.py
    """
    if sys.stdin:
        for l in sys.stdin.readlines():
            if "pad" not in l:
                bambooid= l.split()[6].split("=")[1]
                open("xinput4bamboo.sh","w").write(open("xinput4bamboo.tpl").read()%bambooid)
                os.chmod("xinput4bamboo.sh",0755)
- 组合成启动脚本
#!/bin/sh
VER="main-rcloc.sh v10.7.14"
DATE=`date "+%y%m%d"`
MYRC="/home/zoomq/.zoomq/rc.local"
#=========================================================== path defines
LOGF="/var/log/0day/$DATE-myrcloc.log"
#=========================================================== action defines
cd $MYRC
xinput --list | grep "Wacom Bamboo Craft Finger" | python ./xinput4bamboo.py  >> $LOGF 2>&1
./xinput4bamboo.sh  >> $LOGF 2>&1
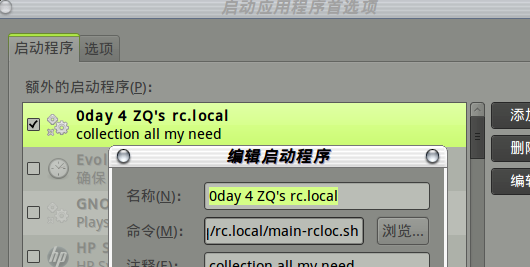
- 部属成启动应用:
 齐活! 没有疑惑,随手写成! 5分钟!
- Python在Unix和Linux系统管理中的应用(影印版):
-

- 绝对好书! 值得慢慢看,E文非常简洁,Py清明的代码,直接看/尝试就可以体会到本意了...
动力源自::txt2tags
嗯嗯嗯,最近从 六哥的 DUKU 重新激发了评书的记忆,下载了全本 袁阔成(40回)红岩魂的mp3 ;-)
可是解开都是乱码文件名:
- :
 ; ;
- 可恶的中文编码! 一定是在XP 中使用CP936 压出来的
- 怎么整呢?
- Python在Unix和Linux系统管理中的应用(影印版):
-
- 绝对好书! 值得慢慢看,E文的也非常简洁,Py 清明的代码,直接看,尝试就可以体会到本意了...
已知有很多途径...参考:linux下批量修改文件名_乌哥的家常菜_百度空间
- 使用find、awk/grep/sed、mv等命令组合来实现
- 编写Shell脚本运行~ 不就是命令组合嘛,,.,
- rename ... NGU/Linux 中的标准化重命名工具,但是,怎么可以将批量文件中指定前几个字符替换成指定字符?
~/media/4talking/袁阔诚/try> rename -n 's/^.{6}/红岩魂/' *.mp3
...
���һ�38.mp3 renamed as 红岩魂38.mp3
���һ�39.mp3 renamed as 红岩魂39.mp3
���һ�40.mp3 renamed as 红岩魂40.mp3
想嘗試Py 的思路...
import sys,shutil
if __name__ == '__main__':      # this way the module can be
    '''usage:
        $ ls *.mp3 | python rename-zh.py
    '''
    if sys.stdin:
        for l in sys.stdin.readlines():
            shutil.copyfile(l[:-1], "redStoneSoul-%s"%l[6:-1])
- Python在Unix和Linux系统管理中的应用(影印版):
-
- 绝对好书! 值得慢慢看,E文非常简洁,Py清明的代码,直接看/尝试就可以体会到本意了...
动力源自::txt2tags
# -*- coding: utf-8 -*-
"""
index_static.py
- just fixed for pyblosxom-cmd staticrender export all .html links
base index.py from:
http://snarfed.org/space/pyblosxom+index
Ryan Barrett
This plugin displays an alphabetical index of all entries. It uses these
optional config variables from config.py, shown here with their defaults:
py['index_trigger'] = '/site-index'
py['index_num_columns'] = 2
py['index_letters_first'] = True
py['index_title'] = 'index'
py['index_use_story_template'] = True
VERSION:
0.2
TODO:
- use a template instead of hard-coded HTML
Copyright 2006 Ryan Barrett
This program is free software; you can redistribute it and/or modify
it under the terms of the GNU General Public License as published by
the Free Software Foundation; either version 2 of the License, or
(at your option) any later version.
This program is distributed in the hope that it will be useful,
but WITHOUT ANY WARRANTY; without even the implied warranty of
MERCHANTABILITY or FITNESS FOR A PARTICULAR PURPOSE. See the
GNU General Public License for more details.
"""
import math
import os.path
import time
from Pyblosxom import tools
import Pyblosxom.entries
__author__ = 'Ryan Barrett'
__version__ = '0.2'
__url__ = 'http://snarfed.org/space/pyblosxom+index'
__description__ = 'Displays an alphabetical index of all entries.'
def verify_installation(request):
return 1
def cb_filelist(args):
request = args['request']
http = request.getHttp()
data = request.getData()
config = request.getConfiguration()
trigger = config.get('index_trigger', 'site-index')
if http['PATH_INFO'] != trigger:
return
# get the entries
datadir = config['datadir']
files = tools.Walk(request, datadir)
files.sort()
# sort into sections, one for each letter. the dictionary is
# letter => (entry name, path) where path is the relative to datadir.
sections = {}
entry_extensions = data['extensions'].keys()
for file in files:
assert file.startswith(datadir)
path, ext = os.path.splitext(file[len(datadir):])
if ext[1:] in entry_extensions: # strip the leading period from ext
entry_name = os.path.basename(path)
sections.setdefault(entry_name[0].upper(), []).append((entry_name, path))
# extract the first letters. sort as usual, except that numbers and other
# non-letters go *after* letters.
def letters_before_symbols(a, b):
if a.isalpha() and not b.isalpha():
return -1
elif not a.isalpha() and b.isalpha():
return 1
else:
return cmp(a, b)
letters = sections.keys()
if config.get('index_letters_first', 1):
letters.sort(letters_before_symbols)
else:
letters.sort()
# add the header with links to each section
body = '\n
\n\n'
# add the sections themselves, with one link per entry, in a table. the
# number of columns is taken from the index_num_columns config variable.
# entries are ordered down each column, in order.
num_cols = config.get('index_num_columns', 2)
for l in letters:
body += '%s \n' % (l, l)
body += '\n'
entries = sections[l]
entries.sort()
num_rows = int(math.ceil(float(len(entries)) / num_cols))
for row in range(0, num_rows):
# alternate the tags' class between index-row-stripe-0 and
# index-row-stripe-1, so you can use CSS to alternate their color for
# readability, if you want.
body += ' \n' % (row % 2)
for col in range(0, num_cols):
entry_index = col * num_rows + row
if entry_index < len(entries):
entry_name, path = entries[entry_index]
else:
entry_name = path = ''
body += '| %s | \n' % (path[1:], entry_name)
body += ' \n'
body += ' \n
\n\n'
data = {'title': config.get('index_title', 'index')}
# use the epoch for mtime. otherwise, pyblosxom uses the current time, which
# makes other plugins (like weblogsping) think this is a new entry.
epoch = time.localtime(0)
fe = Pyblosxom.entries.base.generate_entry(request, data, body, epoch)
return [fe]
def cb_story(args):
request = args['request']
http = request.getHttp()
config = request.getConfiguration()
trigger = config.get('index_trigger', 'site-index')
if (http['PATH_INFO'] == trigger and
not config.get('index_use_story_template', 1)):
title = config.get('index_title', 'index')
args['template'] = '%s\n
\n$body' % title
return args
# -*- coding: utf-8 -*-
from Pyblosxom import tools
import os, os.path, posix, re, stat, time

FILETIME = re.compile('^([0-9]{4})-([0-1][0-9])-([0-3][0-9])-([0-2][0-9])-([0-5][0-9]) +(.*)$')

all_timestamps = {}
extensions = []
timestamps_to_save = {}


#mode: python; indent-tabs-mode: t, tab-width: 4
"""
This allows the user to create a file "timestamps" in their datadir,
that will override the timestamp of any given blog entry. Each line
in this file should be of the form "YYYY-MM-DD-hh-mm file-name".
Then for any entry that one of these lines exist the system will use
that timestamp instead of the actual files modification time.

Note: the filename is relative to your data-dir.
Example of a line for the file /var/data-dir/school/abc.txt
   where the datadir is "/var/data-dir/" and the date is Aug 9, 2004.

2004-08-09-00-00 school/abc.txt
"""
__author__ = 'Nathan Kent Bullock, Ryan Barrett'
__homepage__ = 'http://snarfed.org/space/hardcodedates'
__email__ = 'nathan_kent_bullock -at- yahoo.ca, hardcodedates -at- ryanb.org'
__version__ = '1.4'
def init(request):
    if all_timestamps:
        return  # already initialized

    datadir = request.getConfiguration()['datadir']
    timestamp_file = os.path.join(datadir, 'timestamps')

    if os.path.isfile(timestamp_file):
        f = file(timestamp_file)
        for str in f.readlines():
            m = FILETIME.search(str.strip())
            if m:
                year = int(m.group(1))
                mo = int(m.group(2))
                day = int(m.group(3))
                hr = int(m.group(4))
                minute = int(m.group(5))
                mtime = time.mktime((year,mo,day,hr,minute,0,0,0,-1))
                filename = os.path.join(datadir, m.group(6))
                all_timestamps[filename] = mtime

        f.close()

    extensions.extend(request.getData()['extensions'].keys())
    extensions.append(request.getConfiguration().get('comment_ext', 'cmt'))

def cb_filestat(args):
    request = args['request']
    init(request)

    filename = args['filename']
    extension = os.path.splitext(filename)[1][1:]
    datadir = request.getConfiguration()['datadir']

    if all_timestamps.has_key(filename):
        # we know this file's timestamp
        mtime = args['mtime']
        assert isinstance(mtime, (tuple, posix.stat_result))
        args['mtime'] = (mtime[0:stat.ST_MTIME] + (all_timestamps[filename],) +
                         mtime[stat.ST_MTIME + 1:])

    elif extension in extensions and filename.startswith(datadir):
        # we don't know it, but we should. ask the os for it, and remember it.
        args['mtime'] = os.stat(filename)
        all_timestamps[filename] = args['mtime'][stat.ST_MTIME]
        timestamps_to_save[filename] = args['mtime'][stat.ST_MTIME]

    return args

def cb_end(args):
    if timestamps_to_save:
        datadir = args['request'].getConfiguration()['datadir']
        datadir = os.path.normpath(datadir)
        tsfile = file(os.path.join(datadir, 'timestamps'), 'a')
        for filename, mtime in timestamps_to_save.items():
            time_str = time.strftime('%Y-%m-%d-%H-%M', time.localtime(mtime))
            # strip the datadir prefix and directory separator slash
            filename = filename[len(datadir) + 1:]
            tsfile.write('%s %s\n' % (time_str, filename))
            tools.getLogger().info('Saved mtime %s for %s' % (time_str, filename))
        tsfile.close()
        timestamps_to_save.clear()
# -*- coding: utf-8 -*-
"""
category_static.py
- just fixed for pyblosxom-cmd staticrender export all .html links
base index.py from:
http://snarfed.org/space/pyblosxom+index
Ryan Barrett
- Zoom.Quiet 100401
This plugin displays an alphabetical index of all entries. It uses these
optional config variables from config.py, shown here with their defaults:
py['cindex_trigger'] = '/site-index'
py['cindex_num_columns'] = 2
py['cindex_letters_first'] = True
py['cindex_title'] = 'index'
py['cindex_use_story_template'] = True
VERSION:
0.2
TODO:
- use a template instead of hard-coded HTML
Copyright 2006 Ryan Barrett
This program is free software; you can redistribute it and/or modify
it under the terms of the GNU General Public License as published by
the Free Software Foundation; either version 2 of the License, or
(at your option) any later version.
This program is distributed in the hope that it will be useful,
but WITHOUT ANY WARRANTY; without even the implied warranty of
MERCHANTABILITY or FITNESS FOR A PARTICULAR PURPOSE. See the
GNU General Public License for more details.
"""
import math
import os.path
import time
from operator import itemgetter
from Pyblosxom import tools
import Pyblosxom.entries
#import re
__author__ = 'Zoom.Quiet '
__version__ = '11.09.7'
__url__ = "http://blog.zoomquiet.org/pyblosxom/techic/PyBlosxom/plugins/category_static.html"
__description__ = 'Displays an Category index as Tree for all entries. in one page'
DEFAULT_ROOT = []
def verify_installation(request):
return 1
def cb_filelist(args):
request = args['request']
http = request.getHttp()
data = request.getData()
config = request.getConfiguration()
_baseurl = config.get("base_url", "")
trigger = config.get('cindex_trigger', 'site-index')
if http['PATH_INFO'] != trigger:
return
# get the entries
datadir = config['datadir']
files = tools.Walk(request, datadir)
files.sort()
body = ''
#print files
# sort into sections, one for each letter. the dictionary is
# letter => (entry name, path) where path is the relative to datadir.
#sections = {}
# the entrise dictionary is
# path => (entry name, 0)
entrise = []
entry_extensions = data['extensions'].keys()
for file in files:
#objEntry = entries.fileentry.FileEntry(request, file,datadir)
#print objEntry.keys()
assert file.startswith(datadir)
path, ext = os.path.splitext(file[len(datadir):])
if ext[1:] in entry_extensions: # strip the leading period from ext
entry_name = os.path.basename(path)
#sections.setdefault(entry_name[0].upper(), []).append((entry_name, path))
entrise.append((entry_name,path,file))
#print entrise
#sortPaths = sorted(entrise.iteritems(), key=itemgetter(1), reverse=True)
#print sortPaths
#print _baseurl
etree = {}
"""{
"pathID":[(path.split()),"title",...]
,
}
"""
for entry in entrise:
e = Pyblosxom.entries.fileentry.FileEntry(request, entry[2], entry[1])
deeps = entry[1].split("/")[:-1]
pathID = "".join(deeps)
if pathID in etree:
etree[pathID].append((e['title'],entry[1]))
else:
etree[pathID]= [tuple(deeps),(e['title'],entry[1])]
#print etree.keys()
root_path_list = config.get("category_root_list", DEFAULT_ROOT)
root_entry_list = []
for opath in root_path_list:
#print opath
crtRoot = []
for k in etree.keys():
if opath in k:
crtRoot.append(k)
crtRoot.sort()
root_entry_list.append((opath,crtRoot))
'''root_entry_list as::
[('Zen', ['ZenChinese', 'ZenGoogle', 'Zenpythonic']), ('oss', ['oss', 'ossFreeBSD', 'ossMozillaFireFox', 'ossUbuntu']), ('opening', []), ('mind', ['mind']), ('Quiet', ['Quietliving', 'Quietnomeans']), ('utility', ['utilitySubversion', 'utilitySubversionhooks', 'utilitypy4strStructuredText', 'utilitypy4webDjango', 'utilitypy4webMoinMoin', 'utilitypy4webQuixote', 'utilitypy4zh', 'utilityzqlib']), ('internet', ['internet', 'internetFolksonomy']), ('easy', ['easymovie', 'easymusic']), ('techic', ['techic', 'techicEmacs', 'techicPyBlosxom', 'techicPyBlosxomblosxom', 'techicPyBlosxomplugins'])]
'''
body += ' /'
for e in etree[''][1:]:
#print "etree[''] include::",e
body += ' %s%s\n'%(
"...."
,_baseurl
,e[1]
,e[0]
)
#print root_entry_list
for k in root_entry_list:
#['techic', 'techicEmacs', 'techicPyBlosxom', 'techicPyBlosxomblosxom', 'techicPyBlosxomplugins']
body += ' %s/'%k[0]
cpath = ""
for p in k[1]:
#print etree[p]
#[('', 'Zen', 'Chinese'), '9.18', 'CC Salon BJ', '\xe2\x80\x9c\xe5\x9b\xbd\xe9\x99\x85\xe8\x87\xaa\xe7\x94\xb1\xe8\xbd\xaf\xe4\xbb\xb6\xe6\x97\xa5\xe2\x80\x9d\xe4\xb9\x8b\xe5\xa4\xb4\xe8\x84\x91\xe9\xa3\x8e\xe6\x9a\xb4', '\xe8\xa1\xa8\xe5\xbd\xa2\xe7\xa0\x81\xe7\x9a\x84\xe6\xb6\x88\xe4\xba\xa1\xe8\x83\x8c\xe6\x99\xaf\xef\xbc\x81']
epath = "/".join(etree[p][0][2:])
if k[0] != "".join(etree[p][0]):
if cpath != epath:
cpath = epath
ldeep = len(etree[p][0][1:])
if 3 > ldeep:
body += ' %s/'%"/".join(etree[p][0][2:])
else:
body += ' %s/'%"/".join(etree[p][0][3:])
for e in etree[p][1:]:
body += ' %s%s\n'%(
"/".join(etree[p][0])
,"..."*len(etree[p][0])
,_baseurl
,e[1]
,e[0]
)
'''
[('', 'easy', 'movie'), '\xe4\xb8\x96\xe9\x97\xb4\xe5\xae\x89\xe5\xbe\x97\xe5\x8f\x8c\xe5\x85\xa8\xe6\xb3\x95,\xe4\xb8\x8d\xe8\xb4\x9f\xe5\xa6\x82\xe6\x9d\xa5\xe4\xb8\x8d\xe8\xb4\x9f\xe5\x8d\xbf!']
[('', 'easy', 'music'), 'ZARD\xe6\xb6\x88\xe9\x80\x9d\xe4\xba\x86']
for entry in entrise:
e = Pyblosxom.entries.fileentry.FileEntry(request, entry[2], entry[1])
#print e['title']
#print entry[1].split("/")[:-1]
body += ' %s%s%s \n'%(
"...."*len(entry[1].split("/"))
,_baseurl
,entry[1]
,e['title'] #entry[0]
,entry[1]
)
'''
#print body
body +=" %s\n
\n$body' % title
return args
什么事儿呢?
- 在一高压力服务环境中,需要加速系统的响应
- 现行系统对于数据查询要尝试三种数据库源:
- memcache
- redis
- MySQL
- 期望查询加速至少 300%
- 运行环境
-
客户机:
    - 俺的Laptop HP 520
    - 双核CPU 2G内存
    - Ubuntu 9.10
DB主机:
    - CentOS 5.0
    - 单核CPU 4G 内存
这事儿,一想,简单哪,都放内存就好的哪
- 统计了一下需要用来查询的数据不到2千万条
- 折算成文件不过1G
- 加载到内存中,使用 Python 字典结构的话,也最多涨一倍,也完全可以接受
- 速度?!
没有想到,加速,只要不断将代码住短里面写就好!
不知道什么是 IOP?
- 最直接的实现
-
- 从redis 读
- 生成 dict 对象
- 以pickle dump 出序列化文件
- 用pickle load 加载成dict对象
- 代码:
-
#!/usr/bin/python
# -*- coding: utf-8 -*-
import struct,sys,time
import cPickle as pickle
import redis
REVERSION = "r2d.py v10.5.7"
def _push2dict(dictall,key,smembers):
    dictall[struct.pack('I',int(key[1:]))]=[s.split("|") for s in rb.smembers(k)]
    return dictall
if __name__ == '__main__':      # this way the module can be
    if 3 != len(sys.argv):
        print """ %s usage::
$ python r2d.py redistIP limitnumber [like 10000]
        """ % REVERSION
    else:
        hostIP = sys.argv[1]
        limitn = sys.argv[2]
        rb = redis.Redis(host=hostIP, port=6379, db=9)
        rbkeys = rb.keys().split()
        loop = int(limitn)
        s4dict={}
        for k in rbkeys:
            if 0 == loop:
                break
            else:
                loop -=1
                _push2dict(s4dict,k,rb.smembers(k))
        pickle.dump(s4dict, open('r4d.dump', 'wb'))
- 代码足够简单了,单函式,20行
- 速度测试::
- 10W 值对导出 >170秒,导入>4秒;
- 100W 值对导出 >500秒,导入>25秒;
- 1000W 值对导出 失败! 内存提前耗光!
这完全无法接受哪...
- 加速尝试::
-
- 根据 IOP 尽量不用函式,将那个一行函式清除,代码填回循环 ~ 立即获得几秒的加速
- 本来用的就是cPickle 了,模块效率没有办法了
- 嗯嗯嗯,可以不用 cPickle卟?
# 使用 str() 将字典对象用文本的方式记入 .py
vdf = open("r2d.define.py","wa")
vdf.write("s4dict=")
vdf.write(str(s4dict))
vdf.close()
# 使用时直接 import 就好
- 改进后测试::
- 10W 值对导出 >160秒,导入>3秒;
- 100W 值对导出 >400秒,导入>19秒;
- 1000W 值对导出 依然杯具
- 加速不明显:
- 进一步观察到,导出时内存飞速增长:
- 100W级别,要食掉1.6G左右的内存
- redis 本身也很占内存,千万级别时,也要占上G (当然这和条目数量/内容有关)
- 这对于服务器是个不可接受的方式
- 改进中间数据格式:
-
- 从redis 读
- 生成 中间log文件
- 导入成 字典对象
因为有这些现实:
- 想输出不论 pickle 或是 .py 的字典对象,都得先在内存中构造出这一对象
- 随着字典对象的规模增加,必然导致这一构建过程的时间加长
经沈游侠提醒,发现字典对象其实是可以线性输出的:
- 比如说,字典结构如:
{key:[(v1,v2,v3),..]
,...
}
- 那么,就可以通过中间数据文本:
('key', [(v1, 'v2', v3)])
...
- 进行线性加载,e.g:
for l in open("r2d.define.py.log","r").readlines():
    dd = eval(l)
    if dd[0] in s4d:
        s4d[dd[0]].append((dd[1],dd[2],dd[3]))
    else:
        s4d[dd[0]]=[(dd[1],dd[2],dd[3])]
快速修订对应行动代码:
#!/usr/bin/python
# -*- coding: utf-8 -*-
import struct,sys,time
import redis
REVERSION = "r2d.py v10.5.8"
if __name__ == '__main__':      # this way the module can be
    if 3 != len(sys.argv):
        print """ %s usage::
$ python r2d.py redistIP limitnumber [like 10000] > mid-data.log
        """ % REVERSION
    else:
        hostIP = sys.argv[1]
        limitn = sys.argv[2]
        rb = redis.Redis(host=hostIP, port=6379, db=9)
        rbkeys = rb.keys().split()
        loop = int(limitn)
        for k in rbkeys:
            if 0 == loop:
                break
            else:
                loop -=1
                dictkey = struct.pack('I',int(k[1:]))
                sli = []
                for s in rb.smembers(k):
                    rli = s.split("|")[:3]
                    if rli:
                        rli[0] = int(rli[0])
                        rli[1] = struct.pack('I',int(rli[1]))
                        rli[2] = int(rli[2])
                        sli.append(tuple(rli))
                print >> d2f,`dictkey,sli`
                #注意: `obj` 等同 repr(obj)
代码依然简单了,无函式,30行
- 速度测试::
- 10W 值对导出 >150秒,导入>10秒;
- 100W 值对导出 >500秒,导入>20秒;
- 1000W 值对导出 >1300秒,导入>90秒;
- 速度看起来没有什么明显的提高
- 不过!
- 千万级别的数据可以在低配置环境中跑完了!
- 内存占用很稳定永远90M左右,不会随字典对象的增长而增长!
嗯嗯嗯,这算是可用了...
- 继续改进:
-
- 放弃 redis 直接从MySQL 读
- 生成 中间日志
- 导入成 dict 文件
虽然redis 是号称最快的 K/V 数据库产品,但是,明显就是它将整个业务响应速度拖慢了..
- 为什么呢?
-
- 服务器程序和本地程序面对的环境是不同的
- 高压力服务器程序和小压力服务器程序也是不同的
- 简单来说:
- 小型服务~=每秒<C60
- 中型服务~=每秒<C600
- 大型服务~=每秒>C1000
- 面对的矛盾是完全不同的:
- 小型服务->语言执行效率
- 中型服务->框架执行效率
- 大型服务->I/O 响应速度
- 所以,对于面向Web 的查询服务,不论 Redis/MySQL 对于业务系统,都是进程间通讯!
- 每次跨进程通讯,都意味着至少四次I/O操作!
- 所以,当前 Redis->log->内存字典的转换流程,其实包含了 MySQL->Redis 的进程操作
- 另外:
- 遍查 Redis 文档,居然没有
iterkeys() 类似的操作!
- 每次不论转换多少 Redis 的值对,都得使用
keys() 将键先取出来然后再逐一匹配处理
- 怪不得使用 Redis 测试用小仓库(包含20万值对)时,脚本运行速度和使用全数据Redis(千万值对)时速度要相差5倍以上!内存也占用多几倍!
所以!要直接从 MySQL 相关表中读取
配合一SQL 模板:
-- _tpl/all_black.tpl
SELECT v1,v2,v3,v4,id FROM t_black LIMIT %(limitMAX)s;
核心代码:
#!/usr/bin/python
# -*- coding: utf-8 -*-
REVERSION = "m2d.py v10.5.9"
import struct,sys,time

if __name__ == '__main__':      # this way the module can be
    """usage:
$ python m2d.py limit [such as 100] |\
  mysql -h xx.xx.xx.xx -u User -D --password=***  |\
  python m2d.py > m2d.log
    """
    if sys.stdin:
        if 1 < len(sys.argv):
            limit = sys.argv[1]
            limitMAX = int(limit)
            print >> sys.stderr, info
            print open("_tpl/all_black.tpl","r").read()%locals()
        else:
            s4dict={}
            virusname={}
            totalN = 0
            for l in sys.stdin.readlines():
                if "id" in l:
                    pass
                else:
                    totalN += 1
                    lkv=l.split()
                    dictkey = struct.pack('I',int(lkv[0]))
                    lkv[1] = int(lkv[1])
                    lkv[2] = struct.pack('I',int(lkv[2]))
                    lkv[3] = int(lkv[3])
                    print >> d2f,`dictkey,tuple(lkv[1:])`
- 速度测试::
- 0.1W 值对导出 <5秒,导入<1秒;
- 10W 值对导出 >300秒,导入>10秒;
- 100W 值对导出 杯具鸟
- 1000W 值对导出 杯具鸟
- 速度怎么和查询的条目多少有关? 而且一大MySQL 就拒绝服务?
嗯嗯嗯,FT! 当然了,MySQL 请求响应时间是有限制的,大数据传输肯定是有问题的,
利用 LIMIT 的切片!
- 改造前述
m2d.py v10.5.9 SQL生成部分的代码:
step = 5000.0
limitMAX = int(limit)
sqltpl = open("_tpl/all_black.tpl","r").read()
if 1 >= limitMAXb/step:
    print sqltpl%locals()
else:
    for i in range(int(limitMAX/step)):
        limitMAX = "%d,%d"%(step*i,int(step))
        print sqltpl%locals()
- 以 5000 为界限,生成类似
LIMIT 15000,5000 的限制
- 速度测试::
- 100W 值对导出 >290秒,导入>190秒;
- 1000W 值对导出 杯具鸟
FT!怎么回事儿?速度意外的慢!
- 冷静后改进:
-
- 从MySQL 读使用id 进行限制切分
- 生成 中间日志,但是重新设计结构
- 导入成 dict 文件
- MySQL 为什么这么慢?!
-
- 嗯嗯嗯,N久没有使用过DB,这次重温了为什么远离DB的恶体验
- MySQL 本身就不是千万级别的产品,虽然有很多招可以应对
- 不过,以上招都不好使,咨询了一下同事,直接使用ID范畴来限定就好!
SQL 模板配合改进:
-- _tpl/all_black.tpl
SELECT v1,v2,v3,v4,id FROM t_black WHERE id>%(LIMbwID)s AND id<=%(MAXbwID)s;
SQL 生成代码:
step = 3000.0
offset = int(step)
# < <gen_sql_with_max> > 使用Leo 时可以定义子节点将成堆代码变成语义标记
for l in sys.stdin.readlines():
    if "max(id)" not in l:
        amount = l.split()
        MAXbwID = int(amount[0]
        MINbwID = int(amount[1]
        MAXbwA = MAXbID-MINbID
MAXbMAX = MAXbwID
lastID = 0
sqltpl = open("_tpl/all_black.tpl","r").read()
for i in range(MAXbwA/offset):
    MAXbwID,LIMbwID = (MAXbMAX-offset*i,MAXbMAX-offset*(i+1))
    print sqltpl%locals()
    lastID = LIMbID
MAXbID,LIMbID = lastID,MINbID   # 将切片限数之内的尾数个ID也查询出来
print sqltpl%locals()
- 速度测试::
- 100W 值对导出 >280秒,导入>120秒;
- 1000W 值对导出 >1300秒,导入>780秒;
进一步的,发现业务其实可以将双层,两次查询优化成一次查询的!
- 简单的将输出字典的数据结构变成:
{key:v,...
}
- 将原先的2个值结合原先的key 变成键,就成为了全局唯一的key
- 即和MySQL 每行数据完成一一对应
- 速度再测试::
- 100W 值对导出 >250秒,导入>100秒;
- 1000W 值对导出 >1100秒,导入>480秒;
- 哗! 而且加载完后,字典对象所点内存体积也同样减少了 30% !
- 综上:
-
- 应用 IOP 方面的主要招术:
- 表用 函式
- 表用 模块
- 尽量使用 OS 的标准 I/O 进行功能串接
- DOP~
Data Oriented Programming
- 面向数据编程
- 归根到底,程序都得操作数据解决问题
- 服务器端,大并发压力时,最有效的节省I/O 的方式,就是高效方式
- 压缩输入/出的数据量自然是最好的代码!
嗯嗯嗯?!怎么说到最后好象也没有加速到100倍哪?
- 是也乎,是也乎,以上分享的是内存化字典数据的转换脚本加速过程
- 但是最后要加速的是整个查询业务哈?
- 因为涉及公司核心服务,代码就无法展示了
- 不过,现实是:
- 使用了以上 IOP 中提及的基础技巧
- 每查询业务的处理时间从原先的 0.* 秒,加速到 0.00*秒,至少100倍
- 而对应的代码从 几千行,精简到几十行
所以,基本上可以这么理解:
- 将代码每精简一倍体积
- 运行速度就有望提高10倍
不相信? 尝试一哈噻...
- t2t渲染:: 2010-10-09 02:21:36
- 动力源自::txt2tags
- 曾经的 PyBlosxom 1.3.1 发布的

- 从2005年开始用到2007年南下到金山,远离了服务器,发布不便就停了下来,但是总之还在存活...
- 100401 啄木鸟新SA,小白同学升级 FreeBSD 时,发现 PyBlosxom 的cgi 有安全隐患,算是彻底关闭了当年定制了很多东西的hacker 级别Blog 实例;
- 刚好 PyBlosxom1.5-rc1 也发布了,就趁机整体搞一下
习惯性的先计划,再作...
- 从PyBlosxom 1.3.1 升级到 1.5-rc1
- 发布方式从 cgi 升级到 静态发布 (类似 MT 的那种)
- 版本管理从 SVN 迁移到 Hg (依然在 code.google 空间中)
从用途来分类
- 归档:
-
- 使用 xhtml作为最终输出
- 按照年月归档并计数
- 按照分类归档并计数
- 对所有图片进行简单的图库管理
- 导览:
-
- 对静态页面网站提供搜索
- 前后关联文章的快速链接
- 分页式的导航链接 杯具的插件,在静态发布状态中
- 按照文章首字母的总索引
- 支持多种语言的语法高亮
- SNS:
-
- rdf/rss 自动生成
- 评注?-( (mail 先)
- TAG云?-( (和分类有重叠)
就是当前这个重生的 ZQ's PyBlosxom 了
- demo
-
py["plugin_dirs"] = [os.path.join(blogdir, "plugins")
                        ,os.path.join(blogdir, "plugins/archives")
                        ,os.path.join(blogdir, "plugins/navigate")
                        ,os.path.join(blogdir, "plugins/date")
                        ,os.path.join(blogdir, "plugins/preformatters")
                        ,os.path.join(blogdir, "plugins/folksonomy")
                        ,os.path.join(blogdir, "plugins/willplugins")
                        ,os.path.join(blogdir, "plugins/zqpyb+")
                        ]
不断维护的完美之途紀...
- PyBlosxom 静态化发布体系:
-
- 升級到 1.5.1b
- 摸索静态化发布
- 升迁旧样式
- 兼容插件
- 微调样式:
- Hg的 hooks 部署
- dot 的自动包含图片热区定义的 t2t 处理
- Leo 中的自动化发布脚本按钮
动力源自::txt2tags

- 历史小记:
-
- 2005-12-10 07:34:19 梁如军,Osmond创建维基入口
- 2007-07-26 22:07:06 +0800 Zoom.Quiet 创建工程环境 openbookproject - Project Hosting on Google Code
- 在OBP组织下2007-12-07 《Python核心编程》(中文第二版) (豆瓣) 完成翻译,也引发了书评__China-Pub 《Python 核心编程》应属于社区翻译 吉广事件!
- 在OBP组织下2008-04-01 Python源码剖析——深度探索动态语言核心技术 (豆瓣) 完成校对
- 在OBP组织下2009-09-01 可爱的Python (豆瓣) 方式发售
- http://obp.zoomquiet.org/ 开始使用Sphinx 持续日编译发布最新 OBP 成果...
- t2t渲染:: 2010-10-09 02:21:43
- 动力源自::txt2tags
|


